
Architecture Overview
Introduction
Setup
Presenting products
Understanding prices
Managing checkout
Saleor CLI
ISR for E-Commerce
Real-time Search with Typesense
Getting Started
Saleor provides you with a quick way to set up the platform for your business client. Instead of forking the repository or resorting to the web version you may use the command-line interface (CLI), which gives you a quick access to many actions, like registering an account, logging in or handling your projects and environments from the level of a terminal.
This page guides you through a list of the Saleor CLI commands, alongside their optional parameters for additional behavior. It will get you up and running with your Saleor Cloud instance in no time.
Prerequisites
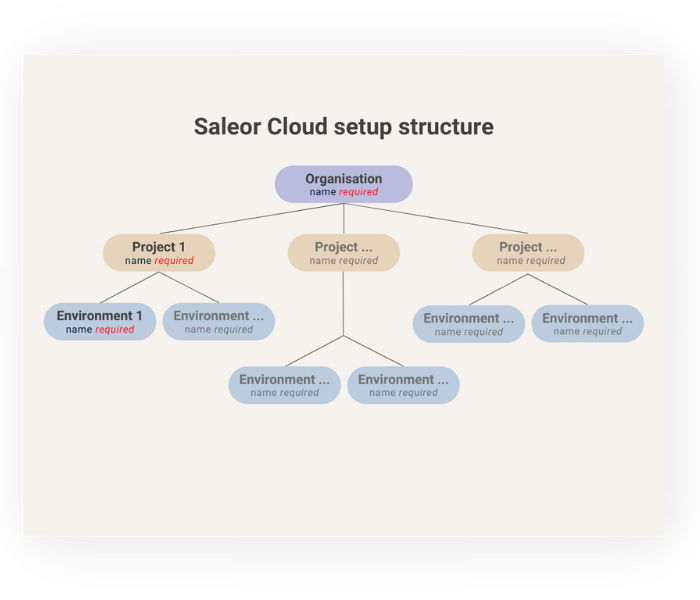
Organisation
The place where you will store data about billing, staff members and other general configuration details. You can have many organisations under one account.
Project
It aggregates your environments. You can have many projects in an organisation.
Environment
One particular instance of your e-commerce data. It is equipped with a GraphQL-powered database and accessible through a dedicated dashboard. Every newly created environment defaults to a sandbox mode, you can then stage it for production. You can have many environments in a project.
Installation
To download and install Saleor CLI, run the following command:
npm i -g @saleor/cli
Getting Help
Typing saleor in the terminal will display a list of possible commands and their descriptions. Typing saleor <command> will display additional comands list for this particular command. This way, you can navigate over the interface to trigger specific actions.
Logging in or Registering
Firstly, you need to login into an existing Saleor Cloud account or create a new one. In order to log in let's type:
saleor login
command, which will redirect you to a webpage with authentication. There, you need to pass in your login credentials. After a successful login, you can come back to the CLI.
Alternatively you can login without the need of a browser. Use --headless flag which prompts for a token created with Saleor Cloud webpage. Useful for CI, VPS, Docker environments or environments with connectivity issues.
saleor login --headless
In order to create a new account you need to use:
saleor register
and go through the wizard.
Setting up your organisation
As of CLI version 1.13, there is no possibility to create an organisation using command line. Once logged in, use the Saleor Cloud webpage to set up your organisation. You can however list, remove and switch between your orginisations using the CLI.
Creating a new Project
After setting up the organisation, you are ready to create your first project. In the terminal, type in:
saleor project create
After selecting the organisation, typing in the name and choosing the region, you'll be set up.
Creating a new Environment
Last thing to set up is the environment. The setup flow is going to be quite the same as with the previous iterations. In the terminal, use:
saleor env create
In the process of establishing the environment, you will be prompted for some details, like the project name, database template or sandbox version. You will also have the possibility to opt in for a dashboard access and basic authorisation.
And that's it! You are now ready to use the features of the Saleor Cloud.