
Architecture Overview
Introduction
Setup
Presenting products
Understanding prices
Managing checkout
Saleor CLI
ISR for E-Commerce
Real-time Search with Typesense
Fetching Products
In Saleor, you can fetch:
- a collection of products by using the
productsquery, or - a single product by using the
productquery that requires the productIDas input.
The first operation also enables you to filter and sort a collection of products by specifying either the filter criteria or the sorting parameters.
Fetching a collection
Let's start with a simple collection of 12 elements that returns a product id and name. Put the following GraphQL query inside the GraphQL Playground of your Saleor endpoint and execute it using the play button in the middle.
# graphql/queries/ProductGetTwelveElements.graphql
query ProductGetTwelveElements {
  products(first: 12, channel: "default-channel") {
    edges {
      node {
        id
        name
      }
    }
  }
}
Heads up!
It's a good practice to always name your GraphQL queries even if it's not required by the GraphQL engine as it helps with caching and debugging.
The first parameter specifies how many elements we want to fetch from the Saleor API. This parameter is required to avoid fetching too much data in case we have many products in our backend.
Here's how a typical response to that query may look like:
{
  "data": {
    "products": {
      "edges": [
        {
          "node": {
            "id": "UHJvZHVjdDo3Mg==",
            "name": "Apple Juice"
          }
        },
        {
          "node": {
            "id": "UHJvZHVjdDo3NA==",
            "name": "Banana Juice"
          }
        }
        // ... 10 more
      ]
    }
  }
}
Another way of controlling the number of elements to fetch is through pagination. We will discuss it at the end of this section.
Autogenerate a React Hook for Products
-
Put the abovementioned query in your storefront under the
graphql/queriesdirectory asProductGetTwelveElements.graphql. -
In the Terminal, run the
generatescript to generate the corresponding React.js hooks:
npm run generate
or
pnpm run generate
Heads up!
If you haven't already, you can add the -w option at the end of the generate script in the package.json file which we configured in the setup section. This option instructs the code generation to keep running and watch for changes in GraphQL files. You can leave it running in a terminal for convenience.
React Component for Product Collection
Let's create our first React component for displaying available products as a grid.
- Create the
componentsfolder in the root folder of your storefront. - Create a file called
ProductCollection.tsxthere and copy/paste the code below:
// components/ProductCollection.tsx
import React from 'react';
import { useProductGetTwelveElementsQuery } from '@/saleor/api';

const styles = {
  grid: 'grid gap-4 grid-cols-4',
  product: {
    card: 'bg-white border',
    summary: 'px-4 py-2 border-gray-100 bg-gray-50 border-t',
    title: 'block text-lg text-gray-900 truncate',
  }
}

export const ProductCollection = () => {
  const { loading, error, data } = useProductGetTwelveElementsQuery();

  if (loading) return <p>Loading...</p>;
  if (error) return <p>Error</p>;

  if (data) {
    const products = data.products?.edges || [];

    return (
      <ul className={styles.grid}>
        {products?.length > 0 &&
          products.map(
            ({ node: { id, name } }) => (
              <li key={id} className={styles.product.card}>
                <a>
                  <div className={styles.product.summary}>
                    <p className={styles.product.title}>{name}</p>
                  </div>
                </a>
              </li>
            ),
          )}
      </ul>
    );
  }

  return null;
}
The GraphQL Code Generator alongside the Apollo React plugin automatically generates the useProductGetTwelveElementsQuery React hook.
Once the data is available, we display the product names as a list. It's worth noticing that the product collection exists as a GraphQL edge as it stores information that goes beyond what's in each object, e.g., the count. Each collection element is a node.
Let's define the export statement in components/index.ts for this component, so we can directly import it from @/components later on.
// components/index.ts
export { ProductCollection } from "./ProductCollection";
Display the Home Page
In Next.js, the routing is generated based on the file system. Each file in the pages directory is available as a route, and pages/index.tsx is the file associated with the / path. Right now, it's just a 4-element grid with links to Next.js resources. So, let's replace it with the ProductCollection component:
// pages/index.tsx
import React from "react";

import { ProductCollection } from "@/components";

const styles = {
  background: "min-h-screen bg-gray-100",
  container: "py-10 max-w-7xl mx-auto",
};

const Home = () => {
  return (
    <div className={styles.background}>
      <div className={styles.container}>
        <ProductCollection />
      </div>
    </div>
  );
};

export default Home;
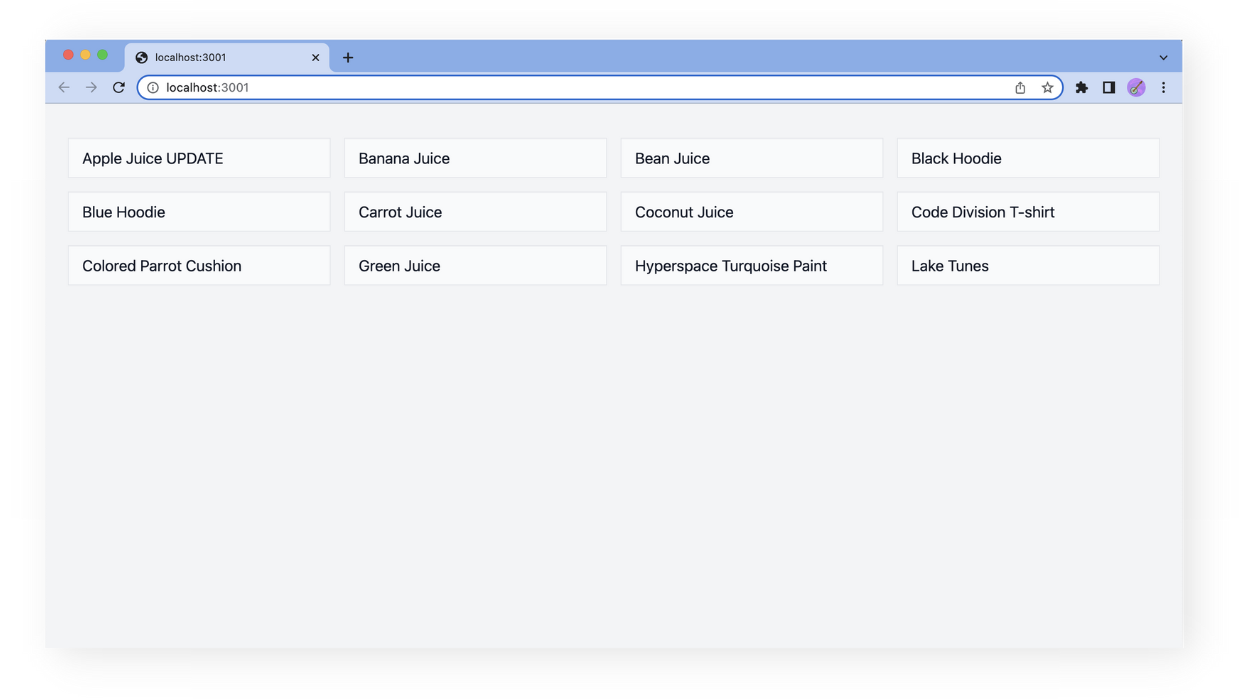
As a result when navigating to localhost:3000/, you should see a grid of product names as shown below:
Additionally, we can standardize the structure for each Next.js page with a fixed layout.
- Create a
Layout.tsxfile in thecomponentsfolder. - Copy the code below and paste it into the
Layout.tsxfile:
// components/Layout.tsx
import React from "react";

interface Props {
  children: React.ReactNode;
}

const styles = {
  background: "min-h-screen bg-gray-100",
  container: "py-10 max-w-7xl mx-auto",
};

export const Layout = ({ children }: Props) => {
  return (
    <div className={styles.background}>
      <div className={styles.container}>{children}</div>
    </div>
  );
};
- Go to
components/index.tsand define the export statement for this component.
// components/index.ts
export { ProductCollection } from './ProductCollection';
export { Layout } from './Layout';
- Rewrite the
Homepage in the following way:
// pages/index.tsx
import React from "react";

import { ProductCollection, Layout } from "@/components";

const Home = () => {
  return (
    <Layout>
      <ProductCollection />
    </Layout>
  );
};

export default Home;
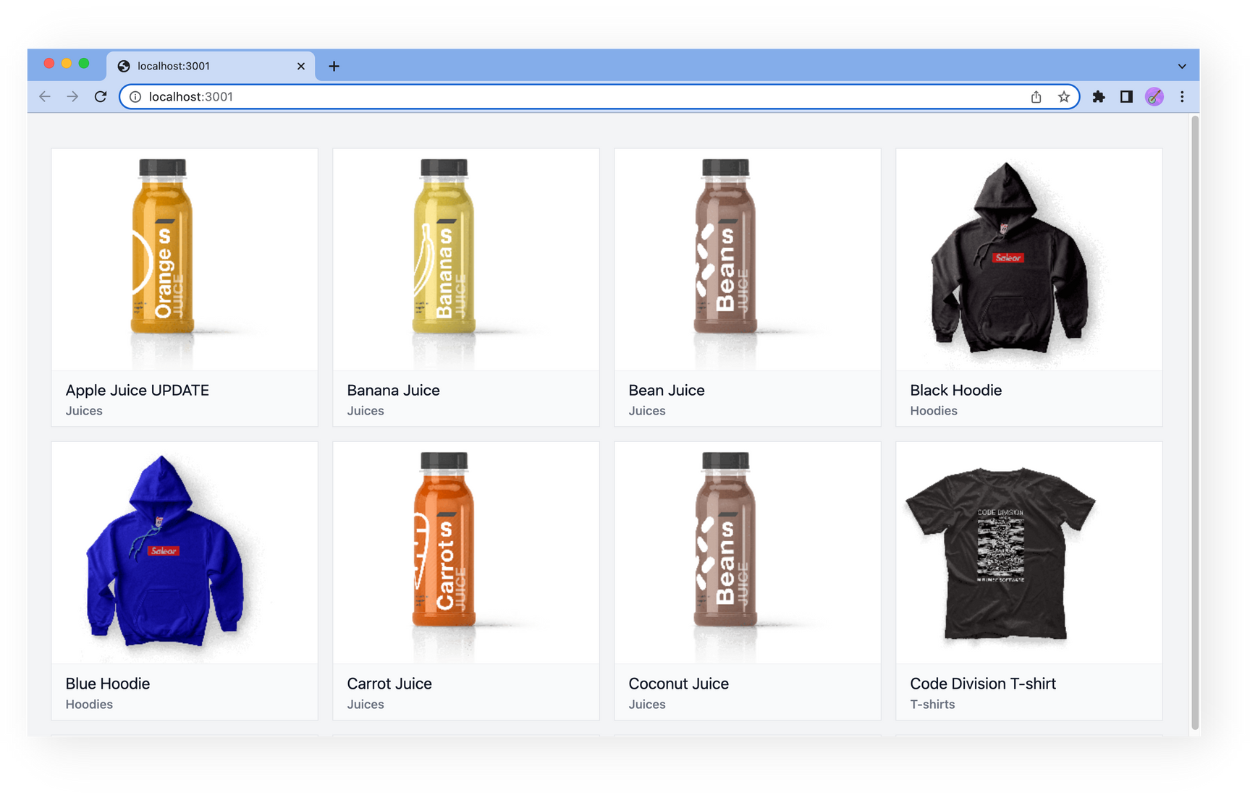
Displaying product thumbnails
Right now, our product collection contains only the product names. Let's improve it by including the product images.
We need to slightly modify our GraphQL query to also include the product thumbnails in the response. While we are at it, we can also fetch the product category.
Here's the modified query:
# graphql/queries/ProductGetTwelveElements.graphql
query ProductGetTwelveElements {
  products(first: 12, channel: "default-channel") {
    edges {
      node {
        id
        name
        thumbnail {
          url
        }
        category {
          name
        }
      }
    }
  }
}
Let's use this query to replace the previous one:
- Paste the abovementioned query into the
ProductGetTwelveElements.graphqlthat is located ingraphql/. - If you have enabled the
watchmode in yourgeneratescript, the Code Generator will now regenerate the types and update hooks for the new query. If you haven't, runnpm generateorpnpm generatein your Terminal to trigger the regeneration. - Head over to the
componentsfolder and modify theProductCollection.tsxcomponent to display the product thumbnails along with their categories:
// components/ProductCollection.tsx
import React from "react";
import { useProductGetTwelveElementsQuery } from "@/saleor/api";

const styles = {
  grid: "grid gap-4 grid-cols-4",
  product: {
    card: "bg-white border",
    summary: "px-4 py-2 border-gray-100 bg-gray-50 border-t",
    title: "block text-lg text-gray-900 truncate",
    category: "block text-sm font-medium text-gray-500",
    image: {
      aspect: "aspect-h-1 aspect-w-1",
      content: "object-center object-cover",
    },
  },
};

export const ProductCollection = () => {
  const { loading, error, data } = useProductGetTwelveElementsQuery();

  if (loading) return <p>Loading...</p>;
  if (error) return <p>Error</p>;

  if (data) {
    const products = data.products?.edges || [];

    return (
      <ul role="list" className={styles.grid}>
        {products?.length > 0 &&
          products.map(({ node: { id, name, thumbnail, category } }) => (
            <li key={id} className={styles.product.card}>
              <a>
                <div className={styles.product.image.aspect}>
                  <img
                    src={thumbnail?.url}
                    alt=""
                    className={styles.product.image.content}
                  />
                </div>
                <div className={styles.product.summary}>
                  <p className={styles.product.title}>{name}</p>
                  <p className={styles.product.category}>{category?.name}</p>
                </div>
              </a>
            </li>
          ))}
      </ul>
    );
  }

  return null;
};
The Product Element component
Before we dive into other Saleor features, let's take a moment to slightly refactor the ProductCollection component. We can take each product element in the list and put it into a separate component.
- In the
components/folder create aProductElement.tsxand copy/paste the code below:
// components/ProductElement.tsx
import React from "react";

const styles = {
  card: "bg-white border",
  summary: "px-4 py-2 border-gray-100 bg-gray-50 border-t",
  title: "block text-lg text-gray-900 truncate",
  category: "block text-sm font-medium text-gray-500",
  image: {
    aspect: "aspect-h-1 aspect-w-1",
    content: "object-center object-cover",
  },
};

import { Product } from "@/saleor/api";

type Props = Pick<Product, "id" | "name" | "thumbnail" | "category">;

export const ProductElement = ({ id, name, thumbnail, category }: Props) => {
  return (
    <li key={id} className={styles.card}>
      <a>
        <div className={styles.image.aspect}>
          <img src={thumbnail?.url} alt="" className={styles.image.content} />
        </div>
        <div className={styles.summary}>
          <p className={styles.title}>{name}</p>
          <p className={styles.category}>{category?.name}</p>
        </div>
      </a>
    </li>
  );
};
- Add the
exportstatement for this component tocomponents/index.ts:
// components/index.ts
export { ProductCollection } from './ProductCollection';
export { Layout } from './Layout';
export { ProductElement } from './ProductElement';
- Reorganize the
ProductCollectioncomponent in the following way:
// components/ProductCollection.tsx
import React from "react";

import { Product, useProductGetTwelveElementsQuery } from "@/saleor/api";
import { ProductElement } from "@/components";

const styles = {
  grid: "grid gap-4 grid-cols-4",
};

export const ProductCollection = () => {
  const { loading, error, data } = useProductGetTwelveElementsQuery();

  if (loading) return <p>Loading...</p>;
  if (error) return <p>Error</p>;

  if (data) {
    const products = data.products?.edges || [];

    return (
      <ul role="list" className={styles.grid}>
        {products?.length > 0 &&
          products.map(({ node }) => (
            <ProductElement key={node.id} {...(node as Product)} />
          ))}
      </ul>
    );
  }

  return null;
};
Refactoring ProductElement out of ProductCollection doesn't change anything visually in our application at this stage. However, the code is organized a bit better.